
Solar street lights use solar panels to convert solar energy into electricity during the day, and then store the electricity in the battery through a smart solar controller.
When night comes, the sunlight intensity gradually decreases, and when the smart solar controller detects that the light intensity has decreased to a certain value, it controls the battery to provide power to the LED Light, so that the light source will automatically light up when it is dark.
The intelligent controller protects the battery from charging and discharging, and controls the light source’s on and lighting time.
How to install a solar street light?
Although each set of our street lights comes with an installation manual, I’m sure there are still many people who don’t know the installation process. This article introduces the solar street light installation method.
Friends who do not yet know how to install solar LED street lights can learn about the solar street light installation procedures. (Take 30W LED street light with Lead acid Battery, 6M street light Model for example)
For all-in-two and integrated solar street light installation, will write a special guide later
Table of Contents:
1. Solar street light components
2. Solar street light foundation pouring
3. Solar panel installation
4. LED street lighting installation
5. Lifting of the street lamp pole
6. Battery and controller installation
1. Solar street light components
Solar street light is mainly composed of solar panels, intelligent controller, battery pack, light source, street light pole and bracket, etc.
2. Street Light Foundation Pouring
Determine the installation position of the street light:
The construction worker should determine the installation position of the street lamp according to the construction drawings and survey of the geology of the site, where there is no shade on the top of the street light, with the street light spacing of 20m, otherwise the installation position of the street light should be replaced appropriately.
Excavate the street light pit at the selected street light installation location, at least 1M deep, and the size should be determined by the size of the battery box and the size of the ground cage.
Then place the pre-welded cage into the pit and place one end of the wire pipe in the middle of the pre-buried parts and the other end at the buried battery. And keep the pre-buried parts, the foundation and the ground on the same level.
The pre-built parts are then fixed with C20 concrete. During the pouring process, keep mixing well to ensure the denseness and solidity of the whole pre-buried parts.
When the construction is completed, the residue on the positioning plate should be cleaned up in time, and only after the concrete has completely set (about 4 days, 3 days if the weather is good), and then the solar street lamp can be installed.
3. Solar Panel installation
Put the solar panel on the panel bracket and tighten it with screws to make it firm and reliable.
Connect the output line of the solar panel and tie the output line of the panel firmly with a tie. Pay attention to connect the correct positive and negative poles of the panel,
After connecting the wires, tinned the battery panel junction to prevent the wires from oxidizing. Then put the wired battery board to one side and wait for the threading.
4. LED lighting installation
Put the LED street lamp wire through the light arm and leave a section of light wire at one end of the installation head to install the head.
Support the light pole, put the other end of the light wire through the hole reserved for the light pole, and smooth the light wire to the top end of the pole. Install the light head at the other end of the cable.
Align the light arm with the screw holes on the pole and then tighten the arm with screws using a quick spanner. Visually inspect the light arm to see that it is not skewed and then tighten the arm.
Put the light wire through the top end of the pole and mark it well, then use a thin threading tube to put the two wires through to the bottom end of the pole together with the solar panel wire and fix the solar panel to the pole. Check that the screws are tightened and wait for the crane to lift.
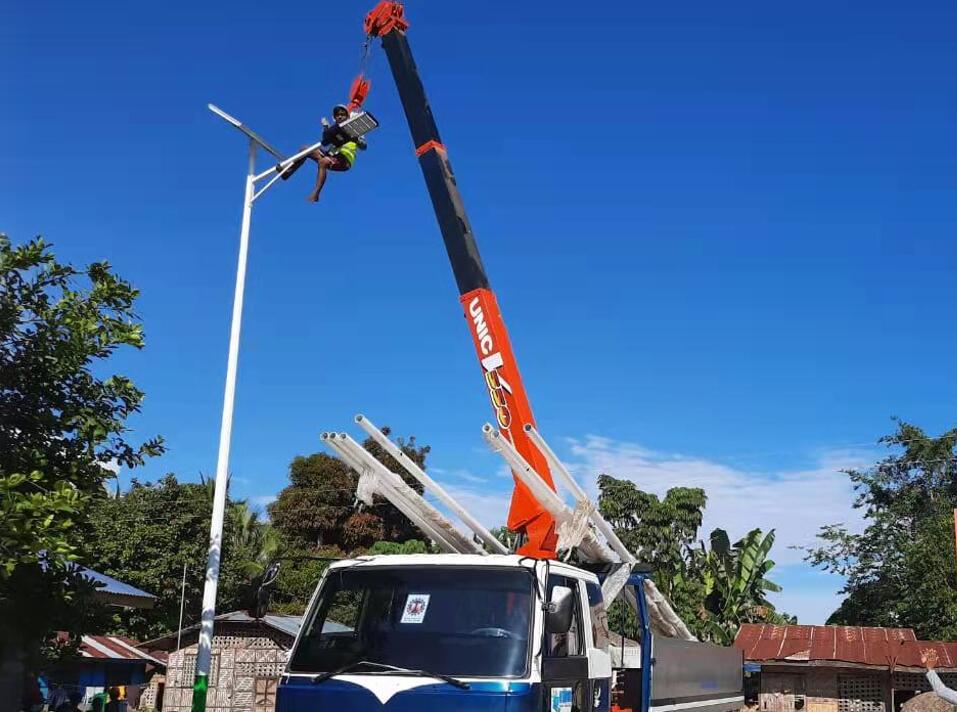
5. Lifting the light pole
Before lifting the light pole, make sure to check the fixing of the components and check if there is any deviation between the light head and the solar panel, and make appropriate adjustments.
Put the crane rope through the lamp pole at a suitable position and lift the lamp slowly. Avoid scratching the battery panel with the crane wire rope.
When the light pole is lifted to just above the foundation, slowly lower the pole and at the same time rotate the pole to adjust the light head to face the road and the hole in the flange to align with the foot bolt.
After the flange is dropped on the foundation, put on the flat pad, spring pad and nut in turn, and finally tighten the nut evenly with a spanner to fix the pole.
Remove the lifting rope and check whether the pole is tilted and whether the pole is adjusted.
6. Battery and controller installation
Put the battery into the battery well and use a thin wire to thread the battery cable to the top of the roadbed.
Connect the connecting wires to the controller according to the technical requirements; first connect the battery, then the load, then the solar panel;
When wiring operation, you must pay attention to each road wiring and the terminals marked on the controller cannot be connected wrong, positive and negative polarity cannot collide, cannot be connected to the opposite; otherwise, the controller will be damaged.
Debug the street light to see if it is working properly; set the mode of the controller and let the street light come on to see if there is any problem, if there is no problem, set the light time and then seal the light cover of the pole.
Remember: before installation, first connect the components to confirm that the lights can be lit normally, and then in the installation operation
Founded in 2003, SUNVIS SOLAR has been dedicated to providing comprehensive Indoor Solar Power Systems and LED Outdoor Solar Lighting Solutions to Government, Commercial Organizations, Wholesale Distributors and other Partners for many years.
Our products include Off Grid Solar Power Systems, Portable Solar Generators, Solar Street Lights, Solar pumps and Solar floodlights, and more.